Thursday, 24 November 2011

Set of coffee tables

These tables were a cheap set my parents had bought for their sitting room when I was a child. When they decided to redecorated they bought new furniture to fit in with the new décor but my mum insisted on keeping the old tables just in case my self or my siblings would need them even after I kept telling her to throw them on the fire!

Set of rehashed coffee tables.
Famous last words! A couple of years ago I found the dismantle set in my parents storage room and decided to up-cycle them (much to my mums amusement!). I’d always hated the original reddish brown varnish so it was really satisfying to get rid of it and discover what was underneath. 

There was a lovely simple pattern on the surface of the table top that I didn’t want to cover so I decided just to paint the legs and under the table tops in my favourite Rosewood varnish so that they would match up with my other furniture.


To add to the plain table top I designed a pattern that would work around the original wood pattern and produced it by using a burning pen that created a deep brown colour to match the rosewood varnish. To then finish and protect the top surface of the table, a couple of coats of clear varnish were painted on. 


When I look at this table set, it just reminds me of how insistent my mother was and how I should have listened to her in the first place! Plus if I ever want to change the burnt on pattern, it can be easily sanded back to make way for a new design or I could cover it up with a patterned fabric or paper.

Rehashed Lamp

The stand of this lamp came from a cheap old marble effect lamp that came from my grandparent’s house. It needed a new look and a rewire so I decided the solution was to take it all apart and rehash it.
Rehashed lamp.
After dismantling the lamp, I rewired and rearranged the stand to a new preferred shape and then painted it in a colour inspired by a new lampshade that I had found and bought. 

Parts of different lamp sections. 
To cover the original ugly cork pad legs under the base of the stand I found a plant pot tray that was the same size as the bottom of the base and the right depth to cover the legs. A hole was then drilled into the side of the tray to allow the cable wire to pass through at a better angle and help the lamp stand a lot better. To keep it attached to the main stand I used double sided stickers on the ends of the cork legs that would still allow easy access to underneath. It was then painted the same colour as the stand to help it blend in and give the finished look. 


With a few adjustments like a simple lick of paint and a brand new shade the old unfashionable lamp has been brought back to life with a new contemporary feel.

Wednesday, 23 November 2011

Small Storage Boxes

Storage boxes

These storage boxes are from Hobby Craft and I absolutely love them. They were discovered after a client asked if I could find a better storage solution for some nails and screws etc that were being kept in lots of separate little bags. She was finding it a hassle to get into them and find what she needed so when I came across the boxes I knew they would be the perfect solution. 


Compartments inside 
Inside each box are lots of small compartments where lots of items can be organised by dividing them up into different types and sizes. This allows you to easily see and collect the items you need when doing various jobs. The boxes themselves are easy to pick up, open and can sit on top of each other with no problem. 


I love how the boxes are simple, small and stylish. The compartments inside keep items organised but accessible and then the shell keeps everything compact and hidden out of sight. They’re a great storage solution for those ugly little D.I.Y items.  

Round Stool


Before. 
After.

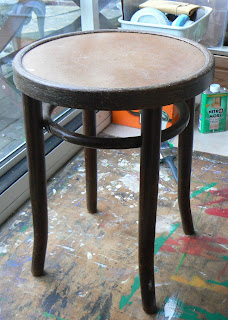
This stool was found in a 2nd hand furniture emporium where the price had been reduced to £5 due to a section of the wooden frame starting to split but despite this I decided to buy it anyway to go with the dinning chairs I already have. To match up with the chairs I painted several coats of my favourite Rosewood varnish on and now it is used either as a side table or as a seat especially when I’ve run out of chairs (as long as nobody too heavy sits on it or the spilt might get a lot bigger!). 

Thursday, 10 November 2011

Stylish Swivel Chair.

After.
From the moment I saw this chair in my sister's garage I knew exactly what I wanted to do with it. It had been found in a skip by my sister's partner but wasn't being used in the house due to the condition it had been found in (picture below) plus my sister's partner was refusing to get rid of it.

Before. 

I'm so pleased that they decided to keep hold of the chair. With a bit of hard work it has been transformed from being tired and scruffy to being smart and contemporary. 

One of the hardest sections to change was the seat frame where the original black plastic covering was peeled back to expose the silver metal underneath (an electric sander was used to get tougher sections off). By doing this the frame now tones in and lifts the other colours of the chair. 

I love how this chair can be used in an office, a sitting room or even as a roundabout for small kids to play on (with adult supervision!), it has become a very useful piece of furniture in the house.  

Tuesday, 8 November 2011

Lazy Susan Potter's Wheel

Glass microwave plate & Potter's Wheel.

I recently discovered that an old microwave plate, that had been given to me by a family friend, fit perfectly on top of my Lazy Susan Potter's Wheel.

The base of the glass plate has what I would call a rim on it that fits perfectly over the plate edge of the Potter's wheel. The rim stops the glass plate from falling off the potter's wheel plate while it is being turned as seen in the picture below.

Glass plate on the Potter's wheel. 
With the addition of the glass plate to the Lazy Susan Potter's Wheel it means that there is space for bigger things to be placed on top of it.

The wheel can also be used as a cake stand that has the bonus of being able to turn to easily show off all sides of the cake.

Another bonus is that the glass plate can be easily removed to be cleaned either by hand or in a dishwasher.

Vintage Shoe Polish Jars

Vintage shoe polish jars.

My mum was having a clear out and came across these old jars, the contents were unusable so she cleaned them out and passed them onto me.

I love the old fashioned lid labels especially the blue one at the front of this picture. I've always been drawn to the old industrial brand labels and posters and love finding items old or new in a similiar style.

I'm not quite sure what I'll put inside them at this precise moment but I'm sure I'll find something!

Friday, 4 November 2011

Refurbished Foot Stool

Refurbished Stool. 


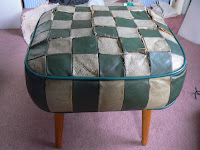
This stool's original leather patchwork cover was slowing falling to bits so I decided to take the opportunity to upcycle the whole piece of furniture. 


The old leather cover and straw cushioning were stripped away to leave the wooden legs and base which I then painted in my favorite Rosewood varnish to get the dark chocolate brown colour that I love so much! As well as a new foam cushion, a new cover was made from a section of a cardigan that I had bought at a charity shop and together they were stapled to the stool base.  


Old leather cover.
Old straw cushioning.


Wooden frame. 
New cushion & cover.


Thursday, 3 November 2011

Chocolicious Tray.


Before. 


This shabby looking tray was turned into a chocolicious delight after several coats of my favorite Rosewood varnish were painted onto the wooden frame.

After about eight coats of the Rosewood varnish, a lovely deep colour appears that always reminds me of dark chocolate and in the after picture you can see how my Mama's chocolate migraine cake compares to the newly varnished frame.   

After. 
    As for the blue tray base, I have always loved the colour and felt no need to change it but by altering the wooden frame to a much darker colour the blue has become much fresher and vibrant. 

A simple solution for making a tired shabby tray into a delightful contemporary piece.


Wednesday, 2 November 2011

Mmmm Chocolate Cake!

Mama's chocolate migriane cake & cream.

There's nothing like my mama's chocolate cake or what she calls her "migraine cake"! It's extremely rich and only really best to eat in small portions with some lovely thick cream (picture). It makes a delicious treat for those days when you might feel the winter blues or if your simply just a chocoholic!  

Tuesday, 1 November 2011

Animal Conkers

Animals made out of conkers.

I discovered this picture of animal conkers in the weekend edition of The Observer last month under the title 'My sunday in a picture'. I've never seen conkers being used in this way and love how decorative they are. They would make lovely autumn decorations for a mantel piece (or something similar) and remind me of the nativity figures you get for Christmas. What a brillant way to start the build up to decorating the house for the festive season!

Autumn Leaves

Autumn is a great time for country walks. Breathing in the crisp fresh air, admiring the changing colour tones of the beautiful countryside and being able to kick the fallen dead leaves. It doesn't matter how old you are, we all love to hear and feel the crunch and rustle of the leaves under our feet.

Standing in fallen leaves.
Kicking the fallen leaves.


Then after all the fun, theres nothing like returning to a warm home to snuggle up by a log fire (if your lucky enough to have one!) with a warm cup of hot chocolate with all the extra trimmings and a good book or a film. The perfect way to spend an Autumn day.

Monday, 31 October 2011

A little Hocus Pocus.

Witches Hats and Lanterns.

I used a little magic to give more character to a couple of plain witches hats by manipulating the shape and surface of the material. Firstly I bent the wire in the back of each of the hats peaks (in certain places) to easily create their own individual shapes. Secondly to add some sparkle to the already attached coloured band and silver jewelled circle I stuck on lots of different sized shiny stars all over the surface of each hat. To make each hat individual they either had silver or gold stars on them and the placement of the stars were different. Thirdly I added a silver jewelled spider onto the orange band hat which was originally a ring that I had bought from a shop and then dismantled it to glue to the centre of the silver jewelled circle. On the purple band hat I removed the silver jewelled circle completely to make the hat more masculine. The cobwebs were a final added bonus to the hats after walking into some doorway decorations!

Witches Hat

Creepy Crawlies

Chocolate Spider Cake.

I made this creepy crawly cake for a fancy dress Halloween party I went to at the weekend. The cake is made from a round sponge base (that I made!) with a layer of chocolate fudge icing spread over it and then topped with chunks of chocolate flakes. The legs are made from chocolate fingers using a little bit of chocolate fudge icing to stick each section together and then the face was made using chocolate buttons and icing. To make the spider look darker and softer I sprinkled some cocoa powder over the top and then  added a spiders web to the cake base to finish the whole look off.

Happy Halloween. Trick or Treat?

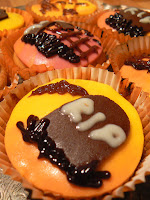
I spent the weekend helping my sister Pip make lots of Halloween cup cake treats so she could take them into work today for her colleagues. We had great fun thinking of and making the different ghoulish themes for each individual cup cake. In fact we were so impressed with our designs it was a shame to see them be taken away to be eaten!

Halloween Cup Cakes.

Here are some close ups of our designs that we created. 

Chocolate Spiders.
Grave Stones.


Ghoulish Ghosts.
Pumpkins.

Wednesday, 26 October 2011

Hampers of storage!

This wooden hamper case was originally given to my parents as part of a food parcel gift and when they had the bathroom refurbished they thought it would fit in really well with the chosen seaside scheme. 

Outside the wooden hamper case. 

Unlike the old bathroom suite where the bath was boxed in and could be used to store (or hide) certain bathroom accessories like the cleaning products, the new suite (being mostly free standing) doesn't have that extra benefit so a storage solution needed to be found. 
   
Inside the wooden hamper case.

Having the hamper case proved to be just what was needed. By standing it on its side the cleaning products can fit easily inside (plus the case takes up less floor space) while the lid can easily be opened and closed (with a lock) to allow access when needed. The shell of the case provides the decorative element to the storage, blending in with the bathroom decor while hiding from view the ugly products. The top of the case also acts as a little shelf for books that might be read while in the bath or to be honest while on the toilet!

A simple and stylish solution to a small storage problem.

Tuesday, 25 October 2011

Mum and Dad's Bathroom

In my previous blog I mentioned about my parents deciding to get a new suite for their bathroom so I thought I would use this next blog to show what was done. Unfortunately I didn't get the chance to take a picture before the avocado suite was ripped out and as I'm not prepared to share any childhood bathtime photo's with you, you'll just have to use your imagination (of the bathroom!)!

The old suite had originally been put in by my Dad well over 25yrs ago and I do remember the bathroom being decorated in the early 90s with flower wallpaper and various peach accessories. But after years of abuse from a large busy family (before houses had ensuite!) and several leaks, the room was looking rather sorry for itself so my parents decided it was time to sort it out.

 No more avocado suite!

After months of research they eventually decided what they wanted and before they knew it the builders had arrived and had completely gutted the whole room. As well as a new suite my parents decided that it would also be a good time to have a new boiler and a solar panel put in (just to make it easier while all the floor boards were up!). The shower runs off the solar panel which is a lot cheaper when its just the two of them using it for the majority of the time.

The layout of the bathroom was designed very carefully by my dad and then I came in as the adviser for the style of the suite and the colours that should be used. In fact there are only two pieces of the suite that are from the same design and they are the toilet and bidet, the rest are separate styles. But by looking for pieces that complemented each other with similar shapes and curves a suite could be made up (being white helped too!).

Deciding on which colours would be best. 

Renaissance Italy was supposed to be the inspiration behind the blue for the bathroom but somehow a sophisticated beach theme occurred. My parents received a couple of decorative beach themed tiles as a gift and I think that was what made them change the theme of the room (pictured below). I remember consulting about the colour of the floor tiles and carpet with the wall paint (as you can see from the picture above) and I did not like the yellow (?) but equally I remember the blue being a problem. Various lighter blue paint testers were made up but they all just made the room seem colder so we went back to the original mix which seemed to work better with all the accessory colours.

The finished look. 

The directors chair was originally mine but wasn't being used and I realised that it would work really well with the theme of the bathroom if the fabric was changed to match the blinds. The carpet (normally a big no no in bathrooms) shape was inspired by the effect you see when the sea tide flows over the sand with the most carpet being used where you would step out of the bath or shower (they do have an extra mat for here!). No carpet layer seemed to want to put the carpet down so I ended up helping my dad by holding either the bath or shower to one side while he cut it in to place. I would like to add that my dad and my sister Clare's partner James ended up plumping the shower (nicknamed "the pod") in themselves on Christmas Eve so that it could be used by the extended descending family! 

What impresses me the most about this bathroom design is the fact that all the parts of the suite stand alone pretty much away from the walls and that there is very little use of tiles except on the floor and skirting. Plus the bath is great for keeping the water really hot (to the point where it can actually get too hot) and because of the way my dad has had the bath positioned you can sit in it and drift away while staring at the trees in the field next door (reminds me of Center Parcs!). To this day, after nearly 3yrs of being completed, my parents still get visitors who get very excited about it and it's always great to hear the reactions!

Monday, 24 October 2011

Wicker Box Stool

After being up-cycled. 
This wicker box was originally being used in my parents very dated bathroom but a few years ago they decided that really the old tatty avocado suite needed to go and be replaced by a more modern white one. So it was out with the old including this wicker box which was also looking very tatty (picture below) and in with the new. I could still see some potential in the stool and I knew I could give it a new lease of life with a little bit of work (plus I knew I would get it for free!) .

Before being up-cycled.
The first thing I did was dismantle the stool lid by taking off the dated and tatty fabric and whatever was left of the cushioning. I then unscrewed the legs before I painted the outside and inside of the main part of the box (I did the legs too while I was at it!) in my usual Rosewood varnish making sure at least 6 coats went on to insure a solid colour. The bottom of the box and under the lid had a coat of white paint to freshen them up before I put a new thick foam cushion on top of the lid. I then covered the foam by using part of a grey woolly cardigan that I had found cheap in a charity shop and attached it by stapling the edges to the bottom side of the lid. For the moment I have kept the legs unattached but if I feel I would like the stool to be higher then I can easily screw them back on (its nice to have the option!).

The stool's new lease of life is now as a place to store my winter accessories like my scarves, gloves and hats etc with the idea that I can place it under my coat rack in the hallway so when I need to get ready to go outside I can access what I need there and then as well as being able to sit down when I'm putting my shoes on. I like the grey woolly cushion cover with the deep brown base as I feel it gives a very natural cosy and warm feeling to the stool which is a style I'm very fond of.

Thursday, 20 October 2011

Table Leg Napkin Rings


Wooden Table Leg Napkin Rings.

These napkin rings originally came from the bottom of the legs of a rectangular wooden garden table that my parents had bought for their newly landscaped patio. And why were the table legs trimmed you ask? Well my parents decided that if all the family turned up then they would need to be able to extend the table. So why not buy another one you say? Unfortunately there wasn't another one in the store but my parents already had some square plastic tables (the legs could be dismantled for storage), so my dad decided that these could be placed next to the table as an extension. One problem, the plastic tables were slightly smaller (height wise) than the wooden table. The solution? Trim the legs of the wooden table to match the plastic ones. Not an easy job for anybody but my Dad did a brilliant job getting all the legs the right length, he clearly remembered what my Grandfather had taught him about always measuring twice and cutting once! I remember my Mum saying she was slightly worried that they might end up with a Japanese style table but clearly she had no need to worry! The tables have worked really well together especially on those rare occasions when there has been decent weather and my parents have been able to have family and friends around for a barbecue.

Wooden Table Leg Napkin Rings in use.

My Mum had kept the cut off ends (probably intending to burn them on their coal fire) and when I found them I knew straight away what they could be used for. My Dad had done such a good job in cutting the ends off (managing to get each one the same size) that I could instantly imagine them being used as napkin rings at a dining table. All they needed was a bit of a sand down and then a lick of varnish to finish them off. Its no surprise that I painted them in my favorite Rosewood varnish but I do like this shade of brown especially with the blue napkins and table cloth (pictured), I think the blue works well with the brown.

I can't imagine that there are many people (if any) who can say that they have napkin rings made from a table's legs. It's certainly very individual and makes a great story when people ask where they have come from and if I ever get bored with them (which I doubt!) at least I know I can recycle them!  

Wednesday, 19 October 2011

White Stuff in Nottingham

A couple of weeks ago I had the pleasure of being taken to White Stuff in Nottingham and from the moment I walked into the store I fell in love with it.

White stuff nottm
White Stuff Shop
Front Nottingham.

The interior decor just blew me away. I love the creative use of old items that may well have previously been forgotten about but now have been given a new lease of life. There are things like the use of old Beano magazine pages that have been turned into a wall covering, an old playground roundabout and a piano being used as clothing display units plus a mixture of what must be reclaimed tiles on the risers (the back) of the stairs.

The changing room design upstairs really stood out to me, I like how each individual changing room has a different traditional house door (reclaimed?) at the front of it that gives the feeling of walking down a street full of houses, it's a really interesting twist to a normally very boring area of a shop. The other thing I like is the paying counter which has been designed like an old traditional sweet shop with the display of old sweet jars on the wall behind and what looks like old fashioned tills on the counter in front, it reminds me of the sweet shop I used to go to as a child and I'm not that old!

The old traditional sweet shop pay counter.

I also like how the quirky decor helps to identify the different sections of the shop like when your in the men's section there is more of a masculine decor by using items from a boys childhood where as in the homeware section reclaimed home furniture has been used as display units like the group of upcycled picture frames that have items hanging inside them. 

It's a very nostalgic place, everywhere you look there is something that catches your eye and reminds you of the things you may have experienced as child which makes it a really fun shopping experience. If you love the idea of upcycled and reclaimed furniture then this is a great place to go for inspiration. All the shops in the chain have been done out in the same style and it would be fun to see how each store differs in their use of different objects as display units.  

I have to admit that after being blow away by all the decor I didn't really get the chance to look at all the products being sold but next time I am in Nottingham I will definitely be going back to have a look again and you never know I might actually get to buy something!  


Tuesday, 18 October 2011

A thousand origami cranes (Senbazuru)

In Japan the crane is a mystical creature and is said to live for a thousand years. The legend states that if you make a thousand cranes your wish will be granted and if you have a Senbazuru in your home it is thought to be powerfully lucky and be a benevolent charm. In my case I only have forty six cranes and a considerable way to go before getting anywhere near a thousand!

I love these paper birds and not just for the legend but because they are a great way to display all the various patterned paper I have collected over the years.

Origami cranes 


They also make lovely table decorations and can be given as a good luck gift to dinner guests or just as a memento from a special occasion.

Table decorations


Only another nine hundred and fifty four origami cranes needed before I can get my wish granted!

Friday, 30 September 2011

Bright Ideas


Marbled lamps.

These lamps originally belonged to my paternal grandparents. The marbled bases had always caught my eye but the lampshades and light bulb holders were making them look really old and tired so I decided with a little love and care I would give the lamps their sparkle back.  

The first thing I did was to get rid of the lampshades which were falling to bits and then separate the parts of each lamp and give them a good clean. The green and silver lamp (pictured in front) was taller than the white one but I wanted them both to be about the same height so I decided to take a section out and trim the inside tubing to the appropriate height. The wiring was also really old and I felt, for safety reasons, it was better to replace it with brand new light bulb holders and cabling. I chose the silver light bulb holders as felt they were more in keeping with the style and colour of the lamps. The only thing left now to get are the lampshades but I won't get any until I have found the right place for them and when I do I will be able choose ones that coordinate with the rest of the decor. 

The lamps might not be exactly the same shape but because they are both pretty much made from the same materials and have similar colours they can work as a pair and still be equally individual which I quite like (and I normally like pairs to completely match!)        

Thursday, 29 September 2011

Dual Purposes

Cushion on top of box.

Originally this box wasn't being used to its full potential. It had been placed under a coat rack in the entrance hallway of a house. It was storing blankets inside which could never be accessed without moving a lot of objects off the top of the lid.

To start with the blankets were found new homes upstairs in the bedrooms where they would probably be more useful. Under the coat rack the box was replaced by a slim shelving unit for shoes which was a better way of utilizing the space and the box was found a place in the kitchen where a chair had originally been put.

Still wanting a place to sit in the kitchen I made the cushion for the top of the box from a spare section of foam I had, an old jumper and an old leftover drawer base. Cutting the drawer base and foam just a little bit smaller than the box lid I layered them up before covering them firstly with a scrap section of white fabric and secondly with part of the old jumper, stapling it all to the bottom of the drawer base.

The cushion sits comfortable on the top but can be easily removed when needing to getting inside the box. Inside it I placed three sturdy plastic shopping bags used to separate different recycling materials. The bags are easy to lift out when they need to be empty into outside containers as well as being easily cleanable when they get dirty.

Recycling bags inside the box.

I'm really pleased that I managed to find a better use for this box. It was so close to being thrown away and it would have been such a shame for it not use its full potential. Because the kitchen is so small the box works really well with its new dual functions, hiding the recycling and being a place for someone to sit plus it is the same colour as the kitchen cabinets so it fits in perfectly.