Thursday, 26 January 2012

Coloured bathroom suite.

When my brother moved into his own place he asked for my help to style and decorate throughout the house including the bathroom which contained a dated chocolate coloured suite. There wasn't the budget to replace it with a white one so I decided to use it as a starting point for developing a fresh new look. 

Old coloured suite made contemporary. 


Old tiles and coloured suite.
To start with I removed the small dated tiles and replaced them with big white floor ones including a line of coloured textured border ones that luckily coordinated with the suite. The remaining free walls were then painted in a paler tint of fawn to tone in with the look as well. To complement the main colour scheme, small amounts of accent colours were added using various bathroom accessories like towels, mats and containers.

I love how this bathroom has been updated using very simple products like the white tiles that have really helped to freshen up the colour of the suite. I find the large tiles make the bathroom feel bigger but also makes the bath look slimmer. The clear glass shower shield also helps to stop the room from feeling cut in half.

When ever I see this room I'm always very impressed with how it turned out. Most people would have ripped the suite out and replaced it with a lovely new white one but by doing the opposite and changing the wall coverings to white or a very pale complimentary colour it has brought the suite back to life.

One day coloured suites will come back with avengeance!  


Wednesday, 25 January 2012

Junk for joy!

Over the weekend I decided to treat myself to a brand new book using some tokens a family friend had given to me after I had helped her to move into a new house. After much deliberating over various art books, I decided to go with Junk for Joy! by Sian Berry. A great book showing you how to turn other people's junk into your own personal stylish items. Although I don't neccessary like some of the final decorative outcomes, I do love the basic ideas as they really make me think how I can adapt them into the style that I or somebody else would like. I'm especially looking forward to trying out turning old beer and wine bottles into vases and pots, it should be fun to see the outcomes! A truely inspiring book with brilliant ideas to reducing our waste and green conscience.

Book of inspiration.

Thursday, 19 January 2012

Decoupage Map Chairs.

Its that time of year again when the majority of people are starting to think ahead and make arrangements for their summer holidays. With travel in mind I wanted to share an idea I had using old british road atlas pages to personalise a set of chairs using the technique of decoupage (the art of sticking paper to a variety of surfaces simply using pva glue).

Decoupage Map Chair.

The idea came about while I was redesigning a bedroom with a map and atlas theme in mind, I noticed the bedroom chairs needed upcycling and suggested covering the frames with maps (an idea I'd seen before) that would add to the individual style of the room.


I transformed a set of four chairs, making sure that at least one coordinated with the bathroom decor (as asked). Two chairs had green seat covers to match the bedroom decor and the other two were given blue seat covers to match the bathroom. As each chair had one british regional road atlas book designated to it, (either north, south, east or west) I made sure that the chair for the bathroom also had a mostly blue sea frame (south coast!) to match the seat cover and room decor.
Decoupage Map Chair.
Decoupage Map Chair. 
Decoupage is such an easy and simple technique that can transform and personalise any interior decor. Once you have choosen your pattern etc you can get sticking, making sure you finish with a top coat of clear varnish to protect all your hard work.

Tuesday, 17 January 2012

Vinyl Record Bookends


Bookends Handmade from 12" Vinyl Records
Vinyl record bookends.

I'm loving these bookends. Handmade by WhenTheMusicsOver on Etsy, they're made from 12" vinyl records. They're fun and funky and a great way to use some of those unwanted and unused records we or (in my case) our parents have!

Monday, 16 January 2012

Curtain hooks for you!

Shower Curtain Hooks.
Over the weekend I discovered a use for those spare plastic shower curtain rings you always collect every time you buy a replacement curtain - to hang normal curtains!
Shower Curtain Hooks.

The reason? My sister Pip wanted to sort out the curtain hanging behind the front door of her house. The original curtain pole and rings were metal so everytime you opened and closed the curtains a very loud noise would occur and it was really starting to annoy her (and me!).

To solve the problem we went on a hunt for some new rings and found metal ones with a plastic inside but then soon discovered that they were too small to fit around the pole.

After some brain storming my sister had the idea of using the spare plastic shower curtain rings that she had been collecting and I then suggested attaching them to the heading tape by simply feeding each one through the string loops (using a pencil to widen the loop beforehand).

While being well hidden by the top of the curtain heading, the rings also keep the fabric stiff and in shape. They also run a lot smoother and quieter along the metal pole than the orginal rings. A simple and cheap solution to an annoying stituation!


Thursday, 12 January 2012

Happy New Year!

One of the many design books that I recieved at Christmas was Design*Sponge at Home by Grace Bonney.

An inspiring treasure chest guide packed with hundreds of ideas that can easily be copied by anyone. It teaches readers that great design isn't just about high price tags but how they can be made using your own self empowerment and expression and create a space that is much more personal.

I especially love the Before & After section of the book. Discovering how pieces of furniture have been rescued and transformed to give them new leases of life. From small easy projects to larger more complicated ones, theres a project for everyone.

A recommended purchase for anyone who enjoys taking on their own DIY projects!

Thursday, 24 November 2011

Set of coffee tables

These tables were a cheap set my parents had bought for their sitting room when I was a child. When they decided to redecorated they bought new furniture to fit in with the new décor but my mum insisted on keeping the old tables just in case my self or my siblings would need them even after I kept telling her to throw them on the fire!

Set of rehashed coffee tables.
Famous last words! A couple of years ago I found the dismantle set in my parents storage room and decided to up-cycle them (much to my mums amusement!). I’d always hated the original reddish brown varnish so it was really satisfying to get rid of it and discover what was underneath. 

There was a lovely simple pattern on the surface of the table top that I didn’t want to cover so I decided just to paint the legs and under the table tops in my favourite Rosewood varnish so that they would match up with my other furniture.


To add to the plain table top I designed a pattern that would work around the original wood pattern and produced it by using a burning pen that created a deep brown colour to match the rosewood varnish. To then finish and protect the top surface of the table, a couple of coats of clear varnish were painted on. 


When I look at this table set, it just reminds me of how insistent my mother was and how I should have listened to her in the first place! Plus if I ever want to change the burnt on pattern, it can be easily sanded back to make way for a new design or I could cover it up with a patterned fabric or paper.

Rehashed Lamp

The stand of this lamp came from a cheap old marble effect lamp that came from my grandparent’s house. It needed a new look and a rewire so I decided the solution was to take it all apart and rehash it.
Rehashed lamp.
After dismantling the lamp, I rewired and rearranged the stand to a new preferred shape and then painted it in a colour inspired by a new lampshade that I had found and bought. 

Parts of different lamp sections. 
To cover the original ugly cork pad legs under the base of the stand I found a plant pot tray that was the same size as the bottom of the base and the right depth to cover the legs. A hole was then drilled into the side of the tray to allow the cable wire to pass through at a better angle and help the lamp stand a lot better. To keep it attached to the main stand I used double sided stickers on the ends of the cork legs that would still allow easy access to underneath. It was then painted the same colour as the stand to help it blend in and give the finished look. 


With a few adjustments like a simple lick of paint and a brand new shade the old unfashionable lamp has been brought back to life with a new contemporary feel.

Wednesday, 23 November 2011

Small Storage Boxes

Storage boxes

These storage boxes are from Hobby Craft and I absolutely love them. They were discovered after a client asked if I could find a better storage solution for some nails and screws etc that were being kept in lots of separate little bags. She was finding it a hassle to get into them and find what she needed so when I came across the boxes I knew they would be the perfect solution. 


Compartments inside 
Inside each box are lots of small compartments where lots of items can be organised by dividing them up into different types and sizes. This allows you to easily see and collect the items you need when doing various jobs. The boxes themselves are easy to pick up, open and can sit on top of each other with no problem. 


I love how the boxes are simple, small and stylish. The compartments inside keep items organised but accessible and then the shell keeps everything compact and hidden out of sight. They’re a great storage solution for those ugly little D.I.Y items.  

Round Stool


Before. 
After.

This stool was found in a 2nd hand furniture emporium where the price had been reduced to £5 due to a section of the wooden frame starting to split but despite this I decided to buy it anyway to go with the dinning chairs I already have. To match up with the chairs I painted several coats of my favourite Rosewood varnish on and now it is used either as a side table or as a seat especially when I’ve run out of chairs (as long as nobody too heavy sits on it or the spilt might get a lot bigger!). 

Thursday, 10 November 2011

Stylish Swivel Chair.

After.
From the moment I saw this chair in my sister's garage I knew exactly what I wanted to do with it. It had been found in a skip by my sister's partner but wasn't being used in the house due to the condition it had been found in (picture below) plus my sister's partner was refusing to get rid of it.

Before. 

I'm so pleased that they decided to keep hold of the chair. With a bit of hard work it has been transformed from being tired and scruffy to being smart and contemporary. 

One of the hardest sections to change was the seat frame where the original black plastic covering was peeled back to expose the silver metal underneath (an electric sander was used to get tougher sections off). By doing this the frame now tones in and lifts the other colours of the chair. 

I love how this chair can be used in an office, a sitting room or even as a roundabout for small kids to play on (with adult supervision!), it has become a very useful piece of furniture in the house.  

Tuesday, 8 November 2011

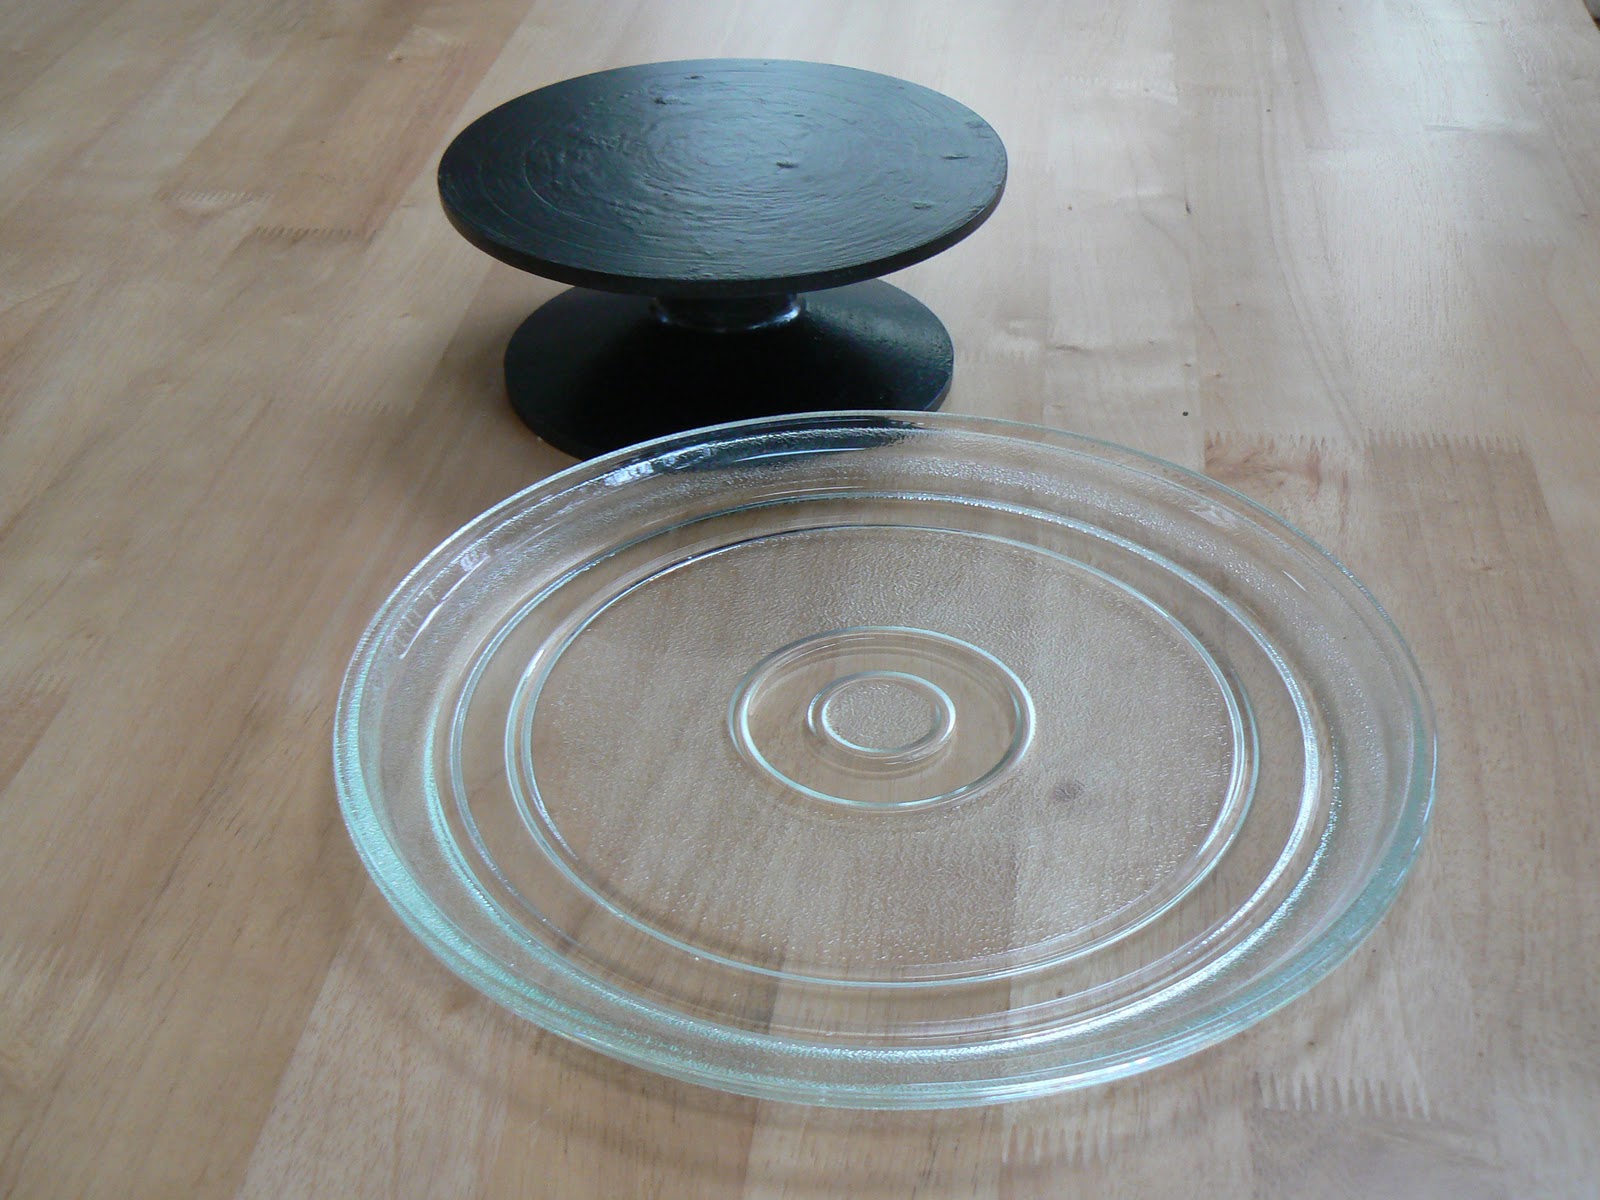
Lazy Susan Potter's Wheel

Glass microwave plate & Potter's Wheel.

I recently discovered that an old microwave plate, that had been given to me by a family friend, fit perfectly on top of my Lazy Susan Potter's Wheel.

The base of the glass plate has what I would call a rim on it that fits perfectly over the plate edge of the Potter's wheel. The rim stops the glass plate from falling off the potter's wheel plate while it is being turned as seen in the picture below.

Glass plate on the Potter's wheel. 
With the addition of the glass plate to the Lazy Susan Potter's Wheel it means that there is space for bigger things to be placed on top of it.

The wheel can also be used as a cake stand that has the bonus of being able to turn to easily show off all sides of the cake.

Another bonus is that the glass plate can be easily removed to be cleaned either by hand or in a dishwasher.

Vintage Shoe Polish Jars

Vintage shoe polish jars.

My mum was having a clear out and came across these old jars, the contents were unusable so she cleaned them out and passed them onto me.

I love the old fashioned lid labels especially the blue one at the front of this picture. I've always been drawn to the old industrial brand labels and posters and love finding items old or new in a similiar style.

I'm not quite sure what I'll put inside them at this precise moment but I'm sure I'll find something!

Friday, 4 November 2011

Refurbished Foot Stool

Refurbished Stool. 


This stool's original leather patchwork cover was slowing falling to bits so I decided to take the opportunity to upcycle the whole piece of furniture. 


The old leather cover and straw cushioning were stripped away to leave the wooden legs and base which I then painted in my favorite Rosewood varnish to get the dark chocolate brown colour that I love so much! As well as a new foam cushion, a new cover was made from a section of a cardigan that I had bought at a charity shop and together they were stapled to the stool base.  


Old leather cover.
Old straw cushioning.


Wooden frame. 
New cushion & cover.


Thursday, 3 November 2011

Chocolicious Tray.


Before. 


This shabby looking tray was turned into a chocolicious delight after several coats of my favorite Rosewood varnish were painted onto the wooden frame.

After about eight coats of the Rosewood varnish, a lovely deep colour appears that always reminds me of dark chocolate and in the after picture you can see how my Mama's chocolate migraine cake compares to the newly varnished frame.   

After. 
    As for the blue tray base, I have always loved the colour and felt no need to change it but by altering the wooden frame to a much darker colour the blue has become much fresher and vibrant. 

A simple solution for making a tired shabby tray into a delightful contemporary piece.


Wednesday, 2 November 2011

Mmmm Chocolate Cake!

Mama's chocolate migriane cake & cream.

There's nothing like my mama's chocolate cake or what she calls her "migraine cake"! It's extremely rich and only really best to eat in small portions with some lovely thick cream (picture). It makes a delicious treat for those days when you might feel the winter blues or if your simply just a chocoholic!  

Tuesday, 1 November 2011

Animal Conkers

Animals made out of conkers.

I discovered this picture of animal conkers in the weekend edition of The Observer last month under the title 'My sunday in a picture'. I've never seen conkers being used in this way and love how decorative they are. They would make lovely autumn decorations for a mantel piece (or something similar) and remind me of the nativity figures you get for Christmas. What a brillant way to start the build up to decorating the house for the festive season!

Autumn Leaves

Autumn is a great time for country walks. Breathing in the crisp fresh air, admiring the changing colour tones of the beautiful countryside and being able to kick the fallen dead leaves. It doesn't matter how old you are, we all love to hear and feel the crunch and rustle of the leaves under our feet.

Standing in fallen leaves.
Kicking the fallen leaves.


Then after all the fun, theres nothing like returning to a warm home to snuggle up by a log fire (if your lucky enough to have one!) with a warm cup of hot chocolate with all the extra trimmings and a good book or a film. The perfect way to spend an Autumn day.

Monday, 31 October 2011

A little Hocus Pocus.

Witches Hats and Lanterns.

I used a little magic to give more character to a couple of plain witches hats by manipulating the shape and surface of the material. Firstly I bent the wire in the back of each of the hats peaks (in certain places) to easily create their own individual shapes. Secondly to add some sparkle to the already attached coloured band and silver jewelled circle I stuck on lots of different sized shiny stars all over the surface of each hat. To make each hat individual they either had silver or gold stars on them and the placement of the stars were different. Thirdly I added a silver jewelled spider onto the orange band hat which was originally a ring that I had bought from a shop and then dismantled it to glue to the centre of the silver jewelled circle. On the purple band hat I removed the silver jewelled circle completely to make the hat more masculine. The cobwebs were a final added bonus to the hats after walking into some doorway decorations!

Witches Hat

Creepy Crawlies

Chocolate Spider Cake.

I made this creepy crawly cake for a fancy dress Halloween party I went to at the weekend. The cake is made from a round sponge base (that I made!) with a layer of chocolate fudge icing spread over it and then topped with chunks of chocolate flakes. The legs are made from chocolate fingers using a little bit of chocolate fudge icing to stick each section together and then the face was made using chocolate buttons and icing. To make the spider look darker and softer I sprinkled some cocoa powder over the top and then  added a spiders web to the cake base to finish the whole look off.